Saturday, July 23, 2016

How to Draw Fur

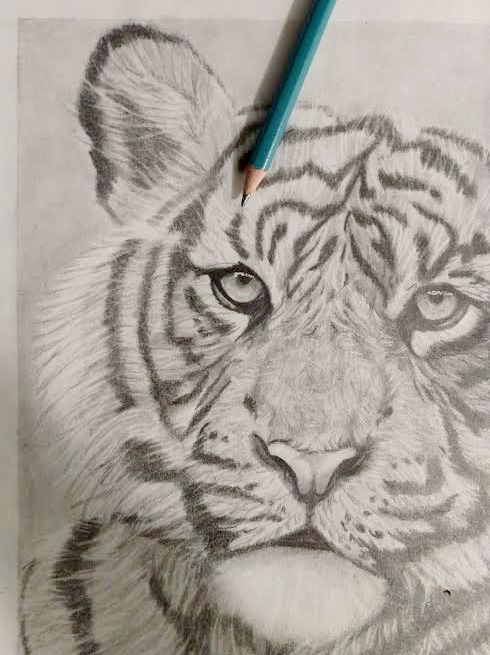
Fur is my favorite! :-) Even though it may seem tedious to draw individual strands of hair on your furry friends, it really transforms a drawing when you add all that texture and dimension. And it really IS fun once you get the hang of it, I promise! ;-) The technique I will be showing you can also be used similarly to draw wrinkles and human hair...

1. Shade 
Firstly, shade the area you are working on to the tone of gray it needs to be. In this example I am working my tiger's ear. I use a 2b graphite pencil to lightly shade, and then go over it with a paper blender to smooth it all out (2b pencils are the best for shading, they blend very well) . Keep layering and blending on the areas that need to be darker. If you need any areas to be EXTRA dark, use a 6b pencil, and blend. 

2. Erase
Next, use either a kneaded eraser, or my favorite, a Tombow MONO Zero eraser (it is firmer, and extra small) to create thin, white, highlight lines for the fur. 


3.Darken
Lastly, use your 2b pencil once again to go along one side of each eraser line, to add contrast. Only darken one side of each piece of fur (I only went along the bottom of each fur strand).
If the eraser lines are too bright white for the animal you are drawing, you can lightly go over everything with your "dirty" paper blender, to make them gray. Or, if you want extra-white, highlight fur in some areas, go over those strands with a white pen like this Sakura GELLYROLL pen.
And that's all! Have fun drawing your fur! ;-)
~Laree


Getting Started (turning a photo into a drawing)


Hello Artists! ;-)

Today I will show you how to get started on turning a photo into a drawing! When drawing a portrait of a person or an animal, for example, it's important to get the proportions right from the start on your rough sketch. We can do this by means of a grid. But, first of all, we need to pick out a picture to draw.

1. Pick Out a Picture

If you don't already have a picture that you plan on drawing, there are quite a number of websites that have high quality copyright-free pictures that you can download. Copyright-free means you can use the pictures in any way you want, without paying for the picture, or giving credit to the owner. Some of my favorite websites to get picture are :
https://pixabay.com/

https://www.pexels.com/

https://freeimages.red/

http://freeuse.io/

2. Turn the Picture Black & White


Once you have a picture picked out, it is really helpful to turn the picture into black & white, since we are drawing in black and white. ;-) This way we can see the the highlights and shadows better, and the tones of gray we need to draw. You can do this with any kind of basic editing program. I did it on my computer with Microsoft Office Picture Manager, by removing all the color saturation.

From this point, you can either start drawing the picture freehand on the paper size of your choice, or go on to the next step of making a grid to make sure the proportions are exact.

3. Print Out the Picture

To make the grid,  you first need to print out the picture. I print it out in either 4x6 or 5x7 size, depending on what works best with the picture I picked out. 
From there, use a ruler to make lines 1 inch apart, going horizontally and vertically on the picture. 
Then, copy the grid onto your drawing paper. First, draw out a 4x6 or 5x7 rectangle, then make the 1 inch squares inside the rectangle. If you want your drawing to be double the size of the picture you printed out (10x12 or 10x14), simply double the grid measurements (2 inch squares instead of 1 inch).


4. Rough Sketch

The last step is to make the rough sketch (the outline) of the subject you are drawing. Look at the picture you printed out with the grid on it, to see exactly where you need to draw on the drawing paper. 

Once you have your rough sketch done, you are ready to fill in the rest! You can keep the grid on your paper, to help to see where the other elements of the picture need to be placed (eyes, nose, mouth, etc.). I usually draw right over the grid, and you cant even tell it was there in the finished product. Of course, if parts of the grid are going to show up through the drawing, you can erase those parts. ;-)

Hope this helps you with your future drawings! ;-) Thanks for reading!
~Laree


Monday, May 23, 2016

What Makes a Drawing Look Realistic?


There are many styles of drawing, and every artist has their favorite. Maybe "cartoon-like" drawings, quick sketches, or doodling is what you like. But if you are like me, you always want your drawings to look as realistic, and "3d" as possible, hoping that it will end up looking like a real photograph! :-) There are so many AMAZING artists out there that make hyper-realistic drawings, and I definitely have a lot to learn to get to their level, but I thought I would share with you what I know, and that is the Top 4 Points to a Realistic Drawing:

1. Light and Shadows
          Which on paper translates into...Shading and Highlighting! Cartoon drawings usually do not have much, if any, shading and highlighting, which makes the picture look flat. But, if you look at a real photograph, you will notice dark areas which "sink in" to the image, and light areas which pop out at you. So when you are drawing with graphite pencils, those dark shadows, bright highlights, and all the tones in between will be imitated by different shades of gray mostly, and then accents of black and white. Be careful not to use too much contrast though! A drawing that is just pure black and pure white won't look very realistic! ;-)


2. Blending
          There are times when it is necessary to have harsh lines, and visible pencil strokes on your drawing, because of the texture you are trying to portray. But for the rest of the time, blending is key! Take a look at the portraits below for instance: 

The one on the left is a picture I drew about 6 years ago, of a person I saw in a book. It does have shading and highlighting, but no blending was done, so her skin has visible pencil strokes on it, which is not very realistic at all! :-) The one on the right is a picture of my mom, that I drew a few months ago. As you can see, it is MUCH more smooth and soft looking.  

I will be writing a blog post soon on how to blend and layer, but these are what I use to do it:

These are called paper blenders, or tortillions, and they are actually pretty cheap (about $5 for a set of 10) and they come in all sizes. I bought mine on Amazon and at the craft store...

3. Proportions
          This one is really important because well , you know, if your horse has too short of legs, it might end up looking like a donkey! Or when you are drawing a person's face, even the slightest change in proportions can make them look like a totally different person. Using a grid to get the initial outline of the subject, and the correct placement of the facial features can be very helpful.

4. Details
          The last important point to remember is the details! Put as many details into the picture as you have the patience to. Don't get frustrated if you don't finish your picture in one sitting! Remember, it does take time to put in all those photo-realistic details. ;-)

Hope this helps you out with your drawings! The next post I will be doing will be titled "Getting Started", where I will explain more about getting proportions right, by making use of a grid, when starting out on a drawing. ;-)

Thanks for reading!!
~Laree

Thursday, May 19, 2016

Welcome to my Art Studio!


Hello and welcome to my art studio!!

I love to draw wildlife & pet portraits, along with people portraits, or anything I am inspired by! :-) On this blog I will be answering some questions I have had on Instagram, about what art supplies are my favorite, and how to make drawings as photo realistic as possible. ;-) I am always looking to learn new techniques and tips, and when I do I will share them with you too!

Do you have any questions / topics you would like me to cover??? Comment your suggestions below and it may be the subject of my next blog post! ;-)

Stay tuned for the first post coming soon...


~Laree